
Sunday 23 December 2012
Friday 21 December 2012


Wednesday 19 December 2012


Friday 14 December 2012
Scene 6 & 7 - Floral Scenes.
These next two scenes will be quite easy and quick to complete, as i am starting to get to grasps with how to use After Effects in general. Due to the previous scene ending on white it makes it very easy for me to animate a flower painting of O'Keeffe's appear on the page. I will do this by key framing the painting at the opacity of 0% and the up it to 100%. However, i do not want this image to be strong, i want it to hint at a painting as i am planning on having some of her brighter paintings in the next scene. Ironically the text will say "O'Keeffe loved bright colourful flowers, which is what she was widely known for." As this scene wont have any bright colour on it at all. To link the next scene on i want to zoom in onto the blackest part of the painting, which happens to be the middle of the painting. Once i have done that i will lower the opacity of the painting and place a solid black layer underneath the painting so it looks like it has darkened. Once i have darkened the black i will then immediately lover the opacity of the black to reveal the almost mood board, collage of the flower paintings beneath.

For this next scene, i am going to make a mini collage of some of O'Keeffe's most bright floral paintings. To make it more interesting then just having a collage on screen, the idea is to make the images one at a time enlarge for the audience to gain a better view and then decrease to its original size after 2 or so seconds. It is a simple exercise as all i have to do it make sure i get the key frames in the right place, and that i make sure that the duration of all the flowers being enlarged are the same length.


For this next scene, i am going to make a mini collage of some of O'Keeffe's most bright floral paintings. To make it more interesting then just having a collage on screen, the idea is to make the images one at a time enlarge for the audience to gain a better view and then decrease to its original size after 2 or so seconds. It is a simple exercise as all i have to do it make sure i get the key frames in the right place, and that i make sure that the duration of all the flowers being enlarged are the same length.

Tuesday 11 December 2012
Scene 5 - 3D Flowers.


Scene 4 - The Camera.
I spent many hours looking for the right camera to use for this part of the clip. I decided to go for a image that filled the whole screen instead of one that would only part fill the screen and leave empty space around the outside of the image. This image is also perfect because it has quite a big flash box where i can key frame a white rectangle flashing to make it look like it is flashing at the audience.
Obviously the camera is also meant to represent a part of O'Keeffe's life as she married the American photographer Alfred Stieglitz and also that she spent a lot of her time modelling for his images.
It was a rather easy to animate as the only thing that moved was the flash of the camera. It also works really well it looks like a camera flash, one thing that would have looked good if i had time would be to add a makeshift camera shutter to look even more like it was taking a photo of the audience.

Sunday 9 December 2012
Scene 3 - New mexican flag.
Really Really simple, easy peasy. I used this image of the Mexican flag:
 I simple deleted out all of the yellow so i was just left with the red symbol. I then imported the Photoshoped file onto after effects and animated the scene very quick and easy. To change the colour of the symbol i simple duplicated the layer and changed the colour to black and made sure they would over play perfectly on top of each other.


Scene 2 - Zoom of book and Designs.
Once i designed the 3D book and made it move and open the way i wanted it to, imported the background and played it over to see how it worked - luckily it worked well. The next scene i have to zoom in on the opened book and i will write on some type to make it look like it is hand written.
Write on affect.
Write on affect.
- Type what you need to type/ what you want to animate
- Move the text around until you are happy with the distance between each letter - i did mine close together so it looked like someone was writing it.
- Effect- Generate - Stroke.
- Use the pen tool and follow the text carefully in the order you would have wrote the text
- When finished click - show masks.
- a white mask will appear over the text - make sure you cannot see any of the original writing underneath the mask - amend if necessary.
- click - reveal original image to the left of the screen.
- then move the 'start' and 'end' button to the number 0. Key frame
- move the start button to 100, and key frame and you will have hand written text.
Saturday 8 December 2012
Designing Scene 1 - Opening Book.
I have been looking for possible images and files that i could use for the opening book sequence. Here are some images of my book work i did to get to the design together for the opening of the book.


- To create the 3D book i had to use photo shop to delete one of the page from the double page spread on the paper design. This was very simple, i used the pen tool to draw around the page i did not want and deleted it.
- I then imported the page photoshoped file - click retain layers. I imported the image of the book cover.
- I made a new composition DV PAL square pixel, 1024x526, square pixel, 25fps.
- I dragged down the two book cover images and named one - top cover and the other bottom cover.
- I did the same with the paper but i dragged one down - i moved the anchor point to the middle of the left hand side, and i duplicated the layer 5 move times so i had 6 of the same pieces of paper, same size and same anchor points.
- Layer - New - Null object - and place the null objects centre point on top of the paper's and the covers centre points.
- Layer - New - Camera - 50mm is the best setting, it shows a replication more like real life.
- Make sure the 3D icon is turned on, on all of the layers and then start key framing the different parts until you are happy with it.
Thursday 6 December 2012
Transition Ideas from Scene to Scene
ALL TRANSITIONS ARE IN RED!
1.
I have an idea for my film to start off as a book on a old
fashioned desk, with old fashioned utensils and various bits and bobs on it. I
will animate the book opening and then the screen will zoom in onto the first
page of the book.
TRANSITION = Zooming in on
the book.
2.
Once the screen has zoomed in onto the book page, "Georgia
O'Keeffe" will appear with a image of her and O'Keeffe's date of birth
and date of death. I think one at a time the items will fade out. I think i will
do this by changing the Opacity of the writing and image from 100% down to 0%.
TRANSITION = The screen will zoom in on the image of O’Keeffe where I wll make the
image double over to create a over
3.
The page that i explained above will fade out and leave a
similar colour solid background on scene three. On this scene i have decided to
make a abstract New Mexican flag. I will have to Photoshop an actual flag so i
can get the actual design of the flag from it. I think i will make the flag
symbol (red) so small you cannot actually see it, and ill make it zoom in on to
the onto the screen where it will turn from red to black. The back circle of
the Mexican flag symbol will line up with the next scene. The writing i will
include will be something like "New Mexico had a strong influence on
Georgia O'Keeffe's work."
TRANSITION = flicks straight onto the next sceen
4.
The next scene will be a close up camera - the circle of the
lens on the camera will line up with the back circle of the New Mexican flag.
The camera will cover the whole scene. The flash on the camera will flash - i
will key frame a bright rectangle in top of the flash to make it look as if the
camera is flashing at the audience.
TRANSITION = the flash covers the whole screen in white which is the
background colour for the next scene.
5.
I want to mention Stieglitz in the film quickly, in the design i
mentioned that i want something romantic, so i think i will use flowers.. i
think probably falling flowers thats curve and sway in a light wind. I will
have a white background, nice and clean looking and i will probably make the
flowers 3D to make it look good. I have actually been looking online and found
some helpful tutorials to assist me when tackling the moving flowers. I will
have a low opacity image of Stieglitz appear and dissolve again on screen and
have writing like "O'Keeffe married an American Photographer, Alfred
Stieglitz." Then everything will dissolve and i will be left with a black
white screen.
TRANSITION = The 3D flowers fade out and reveal the white background
and the next scene starts on a 0%
opacity and after 2 seconds reaches 100% opacity.
6.
The 3D flowers will link up with this scene - i will introduce
some of O'Keeffe's floral painting work. The plan is to insert a Jpeg and have
some basic written information around like like "O'Keeffe loved bright
colourful flowers, which is what she is widely known for."
TRANSITION = The scene will zoom in on the centre of the floral
painting which happens to be black. The screen turns back and then fades out to
reveal the scene underneath.
7.
I will then have almost a mini mood board of O'Keeffe's floral
paintings and put them in a order where i think it is appropriate. I am
thinking i will make some of the paintings one by one enlarge so the audience
can get a better look at the detail of the images. The images will then retract
to their original size and the next image will do the same.
TRANSITION = The last enlarged (pink) flower enlarges enough to
cover the whole scene, I will lower the opacity to reveal a pink solid background,
and then lower the opacity of the pink to reveal a black background. The black
background then lowers its opacity to reveal the next scene. Or I will make it
flick like a page of a book.
8.
From listening to a film where O'Keeffe was being interviewed she
said that "When flowers were scares i would look for bones and
skulls, id paint them." So i will make the screen go black and make a
3D skull which i will animate on screen. It would be different process and
technique to the book and the flower though. I'm not too sure whether i would
actually be able to make it in time, so i could just be a Jpeg of a image i
make. People associate skulls and bones with death, so the blackness around the
skull with represent the norm. However in a film clip O'Keeffe says "The bones
do not symbolise death to me. They are lively, they please me. And i enjoy them
very much in relation to the sky." Therefore, i will turn the
black screen with the skull on it into a bright white screen. It should
transform the way that people look at the skull just by changing the background
colour.
TRANSITION = The skull scene will fade out by and leave a white page
underneath. Directly underneath the skull I will put the start ‘O’Keeffe’s
paintings.
9.
To link on from the skull i will then have three images of some
skull paintings O'Keeffe made. These will appear back to back, they will fade
in and out to have a smooth movement and will have white space to the sides of
each image. I will probably use the quote i mentioned above onto these three
slides - i will split the quite into three parts. "The bones do not
symbolise death to me," - "They are very lively,
they please me" - "and i enjoy them very much in relation to the sky"
TRANSITION = I will zoom into the last skull painting on the scene,
I will zoom in onto the sky and fade the image out, so it leaves the 3D
landscape behind. Which will be zoomed in onto the sky
10.
'SKY..." This will then link onto her landscape work. I
will maybe make a 3D landscape from one of her painting she made which will be
zoomed in looking at the sky. It will zoom out and reveal the 3D landscape
below. Once zoomed out to so the 3D painting fits the screen i will lower the
opacity to 0% and have a solid white background behind.
TRANSITION = I will use a page turn to make it look like the page
has turned. Would be a clean easy to do transition.
11.
This scene will start off with a white background, like the
skull paintings i will have three images of O'Keeffe's landscape paintings
which will do the same as the skull paintings, they will fade in and out and
the next image will follow. "When i got to New Mexico that was mine.
As soon as i saw it, that was my Country."
TRANSITION = Another page turn
12.
The page will turn, and the original paper which i used for the
opening book will be the background and i will insert a pre composition of
O'Keeffe talking about her work with her voice over. The clip i have is 1
minute 30 seconds long, but i really want to include it, its really fun and
sweet.
TRANSITION =Lower opacity to leave the background image (book
paper).
13.
I will fade the film clip out when it has finished and on the
same page i will write something like "One of the most important American
artists of the Twenty-first Century. Georgia O'Keeffe." I will probably
have a image of O'Keeffe, by making it look like it is seeping into the paper.
I will probably use the one of O'Keeffe where she is older - i have is on my
mood board.
TRANSITION = Just a normal zoom as explained below.
14.
The page will zoom out and the audience will see that they were
basically reading a digital book the whole time. It will end on the original
starting design with the red book on top of the old fashioned desk.
TRANSITION = Page turn
15.
I will then make the layer flick up like it is from a book, - i
think there is a page turn affect in after effects with i could use. I will use
the same page design that i used for the other book.. i will have some hand
written type saying something like "And there is so much more, Georgia
O'Keeffe, a true inspiration."
TRANSITION = Zoom out.
16.
I will then let the page fall down and have other pieces of
paper fold down on top to make it look like a thick book or booklet of work,
and i think i will use a scanned image of my student planner and write my name
on that. - I will let the book zoom out and let it fall onto a photography of
my desk.
Wednesday 5 December 2012
Initial Storyboard Ideas and Storyboard
EXPLAINED IN SCENES:
- The way i like to work initially when making a story board is to make a really basic messy one that only really i can understand, it makes i can jot my ideas down quickly, and let them get swept up in a whirl wind. I have an idea for my film to start off as a book on a old fashioned desk, with old fashioned utensils and various bits and bobs on it. I will animate the book opening and then the screen will zoom in onto the first page of the book.
- Once the screen has zoomed in onto the book page, "Georgia O'Keeffe" will appear with a image of her and O'Keeffe's date of birth and date of death. I think one at a time the items will fade out. I think i will do this by changing the Opacity of the writing and image from 100% down to 0%.
- The page that i explained above will fade out and leave a similar colour solid background on scene three. On this scene i have decided to make a abstract New Mexican flag. I will have to Photoshop an actual flag so i can get the actual design of the flag from it. I think i will make the flag symbol (red) so small you cannot actually see it, and ill make it zoom in on to the onto the screen where it will turn from red to black. The back circle of the Mexican flag symbol will line up with the next scene. The writing i will include will be something like "New Mexico had a strong influence on Georgia O'Keeffe's work."
- The next scene will be a close up camera - the circle of the lens on the camera will line up with the back circle of the New Mexican flag. The camera will cover the whole scene. The flash on the camera will flash - i will key frame a bright rectangle in top of the flash to make it look as if the camera is flashing at the audience.
- I want to mention Stieglitz in the film quickly, in the design i mentioned that i wan something romantic, so i think i will use flowers.. i think probably falling flowers thats curve and sway in a light wind. I will have a white background, nice and clean looking and i will probably make the flowers 3D to make it look good. I have actually been looking online and found some helpful tutorials to assist me when tackling the moving flowers. I will have a low opacity image of Stieglitz appear and dissolve again on screen and have writing like "O'Keeffe married an American Photographer, Alfred Stieglitz." Then everything will dissolve and i will be left with a black white screen.
- The 3D flowers will link up with this scene - i will introduce some of O'Keeffe's floral painting work. The plan is to insert a Jpeg and have some basic written information around like like "O'Keeffe loved bright colourful flowers, which is what she is widely known for."
- I will then have almost a mini mood board of O'Keeffe's floral paintings and put them in a order where i think it is appropriate. I am thinking i will make some of the paintings one by one enlarge so the audience can get a better look at the detail of the images. The images will then retract to their original size and the next image will do the same.
- From listening to a film where O'Keeffe was being interviewed she said that "When flowers were scares i would look for bones and skulls, id paint them." So i will make the screen go black and make a 3D skull which i will animate on screen. It would be different process and technique to the book and the flower though. I'm not too sure whether i would actually be able to make it in time, so i could just be a Jpeg of a image i make. People associate skulls and bones with death, so the blackness around the skull with represent the norm. However in a film clip O'Keeffe says "The bones do not symbolise death to me. They are lively, they please me. And i enjoy them very much in relation to the sky." Therefore, i will turn the black screen with the skull on it into a bright white screen. It should transform the way that people look at the skull just by changing the background colour.
- To link on from the skull i will then have three images of some skull paintings O'Keeffe made. These will appear back to back, they will fade in and out to have a smooth movement and will have white space to the sides of each image. I will probably use the quote i mentioned above onto these three slides - i will split the quite into three parts. "The bones do not symbolise death to me," - "They are very lively, they please me" - "and i enjoy them very much in relation to the sky"
- 'SKY..." This will then link onto her landscape work. I will maybe make a 3D landscape from one of her painting she made which will be zoomed in looking at the sky. It will zoom out and reveal the 3D landscape below. Once zoomed out to so the 3D painting fits the screen i will lower the opacity to 0% and have a solid white background behind.
- This scene will start off with a white background, like the skull paintings i will have three images of O'Keeffe's landscape paintings which will do the same as the skull paintings, they will fade in and out and the next image will follow. "When i got to New Mexico that was mine. As soon as i saw it, that was my Country."
- The page will turn, and the original paper which i used for the opening book will be the background and i will insert a pre composition of O'Keeffe talking about her work with her voice over. The clip i have is 1 minute 30 seconds long, but i really want to include it, its really fun and sweet.
- I will fade the film clip out when it has finished and on the same page i will write something like "One of the most important American artists of the Twenty-first Century. Georgia O'Keeffe." I will probably have a image of O'Keeffe, by making it look like it is seeping into the paper. I will probably use the one of O'Keeffe where she is older - i have is on my mood board.
- The page will zoom out and the audience will see that they were basically reading a digital book the whole time. It will end on the original starting design with the red book on top of the old fashioned desk.
- I will then make the layer flick up like it is from a book, - i think there is a page turn affect in after effects with i could use. I will use the same page design that i used for the other book.. i will have some hand written type saying something like "And there is so much more, Georgia O'Keeffe, a true inspiration."
- I will then let the page fall down and have other pieces of paper fold down on top to make it look like a thick book or booklet of work, and i think i will use a scanned image of my student planner and write my name on that. - I will let the book zoom out and let it fall onto a photography of my desk.
THATS THE PLAN.....


Tuesday 4 December 2012
Mood Boards
I know you should start with a time frame for a film when you are starting it, however i'm not actually going to put a time onto it as we were only given a "minimum of 30 seconds". So i will see how long it takes for me to put everything together that i want to put together, and see how long its will take in seconds for it to look right - i wont be rushing it.
First of all i want to start by making some mood boards so i can start to get a idea of what i want to include in my animation - instead of making them on the computer i have cheated and printed off images and arranged them in my book so i can write freely and annotate where i want- i prefer this to begin with, as it helps me to get my ideas down onto paper. From research i have found that O'Keeffe was influences by many things - the things brought up on more then one occasion were


First of all i want to start by making some mood boards so i can start to get a idea of what i want to include in my animation - instead of making them on the computer i have cheated and printed off images and arranged them in my book so i can write freely and annotate where i want- i prefer this to begin with, as it helps me to get my ideas down onto paper. From research i have found that O'Keeffe was influences by many things - the things brought up on more then one occasion were
- New Mexico
- Scenery - paintings
- Flowers - paintings
- Colours
- Bones - paintings
- White Canvas
- Alfred Stieglitz
- Photography
- and a artist called Arthur Wesley Dow


For me it is a necessity to include the all aspects of O'Keeffe's influences as it is a film about her, and certain influences would impact on her work. I know that Arthur Wesley Dow was a icon of O'Keeffe's, he actually taught and mentored her for a big at the beginning of her career. But if i was to add Dow in, i feel like it would be more about her life story, and i want it to be about her work. I love the mood boards with all of O'Keeffe's work on, they are bright, bold, and elegant in a under stated way. I love the brightness of the colours she uses, the are not realistic to the colour of the actual objects she was studying at the time (apart from the flowers and actually the skull work its pretty simular to what a skull would look like - its the backgrounds that are more often then not, abstract.)
Im realy excited to get down and dirty and dive right into making my story boards! Im excited by all the bright colour and rich scenery O'Keeffe spent most of her life with.
Actually before i start i want to make sure i have more images of what O'Keeffe looked like in her hay-day and when she is a little older. I just thought maybe i could have a image of a young O'Keeffe at the beginning of the film and then an older image of O'Keeffe at the end of the film, it could link the end of her life with the end of the film?
I know i already have images of O'Keeffe on my blog already but i wanted to make a little mood board where i could get a good idea of what she was like. Thankfully, due to her marriage to Alfred Strieglitz an American Photographer, there are quite a few images of O'Keeffe, who is actually rather beautiful, even in her elder years she is beautiful, she has perfect facial proportions.
Saturday 1 December 2012
Concepts for Digital film.
After researching into Georgia O'Keeffe's life, i have found that i could do two different stories. Either her amazing career, her paintings, how her life decision to move to New Mexico influenced her work. Or i could look at her personal life, how she met Stieglitz her Husband, her mental break down, her fall from the top and her rise again. She truly is a inspirational woman if you search and read up about her life. However, I personally would like to concentrate on her talent and her love to the surroundings around her. I have found some fabulous clips of O'Keeffe on youtube where she is actually talking to the camera its quite personal and some parts are rather endearing.
Therefore if i am going to concentrate on her artistic life i need to include the following:


Therefore if i am going to concentrate on her artistic life i need to include the following:
- Influences - husband, paints, brushes, landscapes, bones, flowers, New Mexico
- A film clip of Georgia O'Keeffe
- Images of her work - landscapes, flowers, bones etc
- Images of O'Keeffe herself, and one of her husband.


Some examples of the imagery I'm thinking about...
Friday 23 November 2012
O'Keeffe facts
“I found I could say things with color and shapes that I couldn't say any other way - things I had no words for.”
- Georgia O'Keeffe

- Georgia O'Keeffe

Georgia O’Keeffe, Blue Flower, 1918. Pastel on paper mounted on cardboard, 20 × 16 in. (50.8 × 40.6 cm) Georgia O’Keeffe Museum, Santa Fe, New Mexico; gift of The Burnett Foundation. © Private collection via whitney.org
(Completely copied from - http://www.funartwine.com/3/post/2012/03/interesting-facts-about-georgia-okeeffe.html)
Thursday 22 November 2012
Sea Horse Task - Masks.
Today we were carrying on with After Effects, we were given a few instructions, to go onto the internet, and get a image of a fish or something from the sea and then import it to After Effects. The main aim of today is to learn about masking, how to make a mask, how to make the mask move, and how to make the transitions smooth. My image was this seahorse:
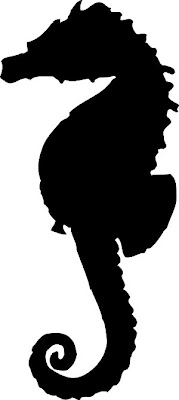
Once we imported out chosen image onto AE we set about making a mask for the shape. However, before we did that we had to make a layer which we block coloured so we could make the mask out of their layer. There are many different mask tools on AE, you can use the shaping tools which make basic masks in the shape of a rectangle, circle, oval etc or you can use the pen tool, you can have a (-) or a (+) vertex which means that you can make a mask that can mask what ever is inside of the mask or outside of the mask.
Due to the bumps and all of the curved edges of the seahorse silhouette it wouldn't get a good idea to use a shape mask as it wouldn't catch any of the detail. I had to use the pen mask, however, when i initially made the mask i made so many points in the mask that it would have been rather labour intensive to move all of the individual points. Jon showed me a clever and rather easy trick to make less points. When you click to make a point hold it down and then you can make the like curved, it means that you can dramatically reduce the amount of points - make it easier to animate, as well as making it less complicated. However, i found that when i went to move the points later on, due to the curve of the line i had put in place, it was difficult to get rid of the initial curve, and ended up looking a little odd.
Once i had made the mask i deleted the image of the seahorses silhouette. I made a new composition to be 10 seconds long and i made the back wing flap and the tail tip unwind a little to make it look like it was moving. To make it look realistic the wind movement would have had to be so quick that it looks like a blur, however, due to memory on the play back and problems with cacheing the animations i decided to keep it less realistic.
 I am not 100% sure why i saved this screen shot. I think i liked the pattern that i made - this was my initial mask before i learnt that i could make a curved mask by holing the mouse button down for longer.
***CURRENTLY UPLOADING A VIDEO ONTO VIMEO ONCE I HAVE DONE THAT I WILL UPLOAD THE SEAHORSE BY ITSELF***
Once i had finished animating the seahorse by itself, i then moved onto deciding what image i would like for the background. I was initially thinking something simple like a plain sea and sand, but i though as my seahorse will be one bright but flat colour, i should probably add more depth by having a background with a lot going on so i took this image from google images:

I imported the image above onto AE and made a new composition 10 seconds long. I added the background images and then i imported the previous seahorse animation i made. Like the previous task i have completed you can simply make a layer move by key-framing the first position of the layer off screen, moving the time line on a few seconds and key frame again, AE will then fill in a smooth transition between each key frame. However if i did this, it would mean that my seahorse would be moving in a straight line - which sea horses DONT do. Therefore i decided that i would need to make my seahorse bob up and down. It just happened that when i made the first two points - the same curved like that i used on AE to make my smoother mask appeared and i could make the path of the sea horse smoother arch shapes rather then harsh triangular shapes. I took a PRINTSCREEN of the process for future reference and for other students in the class to see. You simple right click on each point, click 'KEY FRAME INTERPOLATION' and then change it from 'LINEAR' TO 'BEZIER'. This makes the path smoother as you can see from the image.
(In the print screen below i did had the background in the composition but i hid it from view so i could concentrate on the bobbing movement.)


Once we imported out chosen image onto AE we set about making a mask for the shape. However, before we did that we had to make a layer which we block coloured so we could make the mask out of their layer. There are many different mask tools on AE, you can use the shaping tools which make basic masks in the shape of a rectangle, circle, oval etc or you can use the pen tool, you can have a (-) or a (+) vertex which means that you can make a mask that can mask what ever is inside of the mask or outside of the mask.
Due to the bumps and all of the curved edges of the seahorse silhouette it wouldn't get a good idea to use a shape mask as it wouldn't catch any of the detail. I had to use the pen mask, however, when i initially made the mask i made so many points in the mask that it would have been rather labour intensive to move all of the individual points. Jon showed me a clever and rather easy trick to make less points. When you click to make a point hold it down and then you can make the like curved, it means that you can dramatically reduce the amount of points - make it easier to animate, as well as making it less complicated. However, i found that when i went to move the points later on, due to the curve of the line i had put in place, it was difficult to get rid of the initial curve, and ended up looking a little odd.
Once i had made the mask i deleted the image of the seahorses silhouette. I made a new composition to be 10 seconds long and i made the back wing flap and the tail tip unwind a little to make it look like it was moving. To make it look realistic the wind movement would have had to be so quick that it looks like a blur, however, due to memory on the play back and problems with cacheing the animations i decided to keep it less realistic.

***CURRENTLY UPLOADING A VIDEO ONTO VIMEO ONCE I HAVE DONE THAT I WILL UPLOAD THE SEAHORSE BY ITSELF***
Once i had finished animating the seahorse by itself, i then moved onto deciding what image i would like for the background. I was initially thinking something simple like a plain sea and sand, but i though as my seahorse will be one bright but flat colour, i should probably add more depth by having a background with a lot going on so i took this image from google images:

I imported the image above onto AE and made a new composition 10 seconds long. I added the background images and then i imported the previous seahorse animation i made. Like the previous task i have completed you can simply make a layer move by key-framing the first position of the layer off screen, moving the time line on a few seconds and key frame again, AE will then fill in a smooth transition between each key frame. However if i did this, it would mean that my seahorse would be moving in a straight line - which sea horses DONT do. Therefore i decided that i would need to make my seahorse bob up and down. It just happened that when i made the first two points - the same curved like that i used on AE to make my smoother mask appeared and i could make the path of the sea horse smoother arch shapes rather then harsh triangular shapes. I took a PRINTSCREEN of the process for future reference and for other students in the class to see. You simple right click on each point, click 'KEY FRAME INTERPOLATION' and then change it from 'LINEAR' TO 'BEZIER'. This makes the path smoother as you can see from the image.
(In the print screen below i did had the background in the composition but i hid it from view so i could concentrate on the bobbing movement.)

Once i has happy with the path of the seahorse I played it back with the background to see how it worked. I am pretty happy. Like the Quad bike exercise i simple copy and pasted the bobbing sea horse composition 3 times and individually re-scaled them to make them look different, i also passed them at different times - the further away from the camera the slower it will appear, and the closer to the camera the faster it will appear. I then flipped the paths o the sea horses so that they went back on eachother to create the illusion of more seahorses.
UPLOAD VIDEO URL WHEN UPLOADED TO VIMEO
Subscribe to:
Posts (Atom)