Walk Cycle Perspective
Walk Cycle Side
Camp Walk Perspective
Camp Walk Side
Acting Perspective
Acting Side
Walk and Wave
Shuttlecock MCU
Shuttlecock CU
Bowling Ball CU
Bowling Ball MCU
Tennis Ball CU
Tennis Ball MCU
Thursday, 25 April 2013
Evaluation
Again, much similar to last term, I was a
little daunted by the prospect of doing 3-Dimensional work. I found the initial
tasks rather difficult to graph, my concerns first surfaces when we were given
the task to make a Mr. and Mrs. Potato head. It took me ages to get to grips
with the controls in Softimage. The outcome was rather poor, at this point I
was rather disheartened about the 3D process that was to come.
I have learnt various skills, the main one
is how to use the Softimage interface and animate. I am extremely proud of how
far I have come, I practically found it near impossible to make a good replica
of Mr. and Mrs. Potato head, and now I’ve ended up with some good 3D animation,
and I’ve experimented with different character walks. I have learnt how to use
reference material in the most efficient way by using Premier Pro and adding
effects like Timecode, and adding titles so I can easily see where the key
frames are. I have learnt how to render out 3D animation, as well as exporting
the final targa sequence in After Effects, which was covered in the first
semester. However, most importantly for
me, it really made me look hard at how the body moves, the angles, changing of
weight distribution and I believe I have come out with a solid Acting 3D film.
I found the beginning of the course least
enjoyable, this was because I lacked confidence and I was too scared to really
get stuck into the software. I much preferred the walk cycle and acting
sequence to the ball bounces, maybe this is because I can relate more to a walk
cycle and the action piece, I’m not sure. I found the rendering out rather laborious,
as I had to render it at University, as I do not have Softimage on my home
computer or laptop.
The highlight of this semester was the
acting reference piece. I really loved carefully studying the reference
material, its amazing to see how the body actually moves when doing such a
simple move. I found it’s most important to get the weight distribution
correct, with out this the character looks fake, and I feel it almost lacks in
emotion and power.
However, overall I actually found it to be
quite a rewarding experience. The more time I spent on it the easier it was for
me to complete the tasks. I only started to feel slightly confident when I had
made the walk-cycle; this was after the ball bounces. I really felt confident
about creating the movements and creating the angles to make a realistic walk
cycle. I stormed through this process, creating lots of captures to make sure
it all looked correct. I found the arm movements much harder then the legs, as
they seem to follow an ark motion, which took a while for me to grasp. On the
whole I really enjoyed the process and I would consider it for my chosen
pathway for next year.
Thursday, 18 April 2013


Saturday, 13 April 2013
Rendering files
Just a little bit of warning for everyone, as i think i am ahead of most people at this point. I recreated Fred crying for my acting piece. I made quite a few key frames to get it as accurate to the reference footage as possible. It was going to take over 6 hours to fully render each pass, and just under 13 hours to do the both. This needs to be done way in advance, it is no good waiting to render everything out 3 days before the deadline, as even this could be pushing it.
As an estimate, theses are how long it took to render each scene.
Tennis Ball - 1hour30mins per pass = 3 hours over all
Bowling Ball - 45mins per pass = 1 hour and half over all
Shuttlecock - 2 hours = 4 hours over all
Walk - 1 hour per pass = 2 hours over all
Action - 6 hours 25mins per pass = 12 hours 50mins over all
Therefore if you render the MINIMUM out, and only the first fully rendered versions it could take up to 23 hours 20 minutes of rendering! That is a long time for some projects that if put together only last all of 17 seconds each pass!!!
So its worth getting it done ahead of time, you'll save yourself a lot of stress later on
Friday, 12 April 2013
Waving Action
So, i decided to do a quick waving action - i stress this is a VERY quick one - the arm movement is very basic and robotic in movement, if i spent more time on it i definitely would NOT make it like this.... So instead of writing a whole load about it i will just give you guys a URL to find it :)
Walk and Wave
Walk and Wave
Tuesday, 9 April 2013
Another Attempt at Tennis Ball Bounce
Attempt 1 Medium Close Up - Bouncing on the spot
Attempt 1 Close Up - Bouncing on the spot
The two links above are videos of my first fully rendered attempt at the tennis ball. I felt it was important for me to get the bounce right before i made the balls move in a certain direction. Also i have to admit - i had seen other students work and they made their balls bounce in a direction rather then on the same spot, which is what i make the tennis ball do in the videos above.
When i was first given the task to make the ball bounces, i heard my 3D tutor tell another student that the ball shouldn't role too much as it would make it look like the ball is on a slope and therefore the travel shouldn't be a large distance. I interpreted that as the balls should bounce on the spot. REALISTICALLY..... if you 'dropped' a tennis ball from a height - it would just bounce near enough on the same spot. If you bounced the ball then it would bounce in the direction you intended to bounce the ball in!! The brief says to animate a shuttlecock bowling ball and tennis ball that has been dropped from a height of 1 metre. So logically if would only bounce on the spot - but due to worry i thought i would go one on the spot and one bouncing in a direction.
On my second attempt i was much more confident
Second Attempt Close Up
Second Attempt Medium Close Up
I think that the squash and stretch is much better in my second attempt then in my first. But i really struggled with the spacing out of each bounce in soft image - i struggled to get them quite right and you can see on one of the bounces jumps a much further distance then the previous bounces. Now if the brief had been - make a ball bounce on the spot and then one where the ball is a character - then this would probably have worked. I have to say that i did find the rig rather hard to use as the tennis ball could only squash and stretch at one point - so if i rotated the ball and it landed on a lets say the top right hand corner so (2 o'clock.) The squash at the balls land would be in the wrong place in accordance to the spin. Therefore you have to be careful with how much you rotate the ball, and also the height of each bounce. To work around this i only added one major squash and stretch and one small. This meant it was easier for me to control and i didn't have to muck around too much over rotating the ball to make sure it worked out for me. I am happy with the way the ball bounces but i am not happy with the distance between each bounce. They are too far apart in certain points and too close in others. I wont have time to redo this again at the moment because i want to have another go at re doing the bowling ball and concentrate on the action piece again!
Monday, 8 April 2013
Final Character Walk
Character Walk - Side - 1920x1080
Character Walk - Perspective 1920x1080
This is a rather cheese, cheeky walk - it is quite simple, all i did was lower the height of the hips on the character which changed the angles of the legs but kept the feet positioning the same - which was perfect. I then changed the route of the arms, i made them much higher and bent at the elbow. I also animate the hand a lot more. I animated a flick of the hand to make it look sightly comical and maybe a little camp? However i would like to point out i know that no one, camp or not would walk like this constantly. And if there are i would LOVE to meet you!!
Its probably more of a simpler character walk, if i had some time i would like to do more of a sexy walk, legs crossing over - maybe make the steps longer then 25 frames, this would slow down the walk, which could create a more seductive feel. Maybe a arm on the hips and a glance to the side. With any walk like this is ESSENTIAL to get the hips rolling, any woman or man who is trying to walk in a sedusive manner will definitely wiggle their derriere!
I think i might try a wave now just because i have some time to kill - think will only be quick and rough, nothing too thought out or neat.
Friday, 5 April 2013
Character Walk
I want to make something more energetic then the previous walk i made - i will cheat and use the last version of the walk cycle i made a the frame for the animation. I will then amend the key frames to make a more exaggerated walk!
I have decided to do a over exaggerated slightly camp walk, which low deep knees and high flicking hands - people dont walk like this in real life but i thought i would be fun to play around with and see what it looks like.
I am thinking that as the character walks the down positions will be really extreme almost like the character is squatting. I think i will just dive in and see what i can come up with. I have done a quick sketch which i will include below.
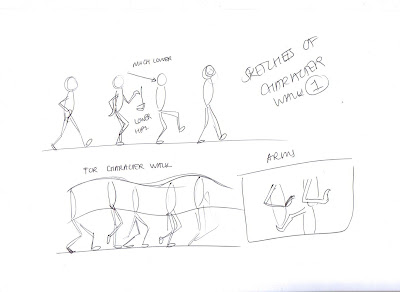

Sunday, 31 March 2013
Final Walk Cycle
I wont right too much on here about the walk cycle as i have done a lot of research on here already. I only just realized that i haven't uploaded up scenes for the walk cycle so i thought i would upload them for you to watch now.
Problems i had:
I had a few problems making this walk cycle, i found it rather easy to make the walk cycle how ever i found that there was a slight pop somewhere in the legs, i don't know if this was because frame 24 and 1 were very similar or just because i had maybe animated it slightly wrong. other then that i am happy with my generic walk cycle, i think its just a casual, walk, there isnt any feeling or emotion that particularly sticks to it, its just a casual walk. I have looped it 20 times like the breif says, but i am happy with it - there are little things that i could tweak and if i have the time i will go back through and look at tweaking everything. Links below!!
Walk Cycle - Perspective 1920x1080
Walk Cycle - Side 1920x1080
Saturday, 30 March 2013
Touching up the Acting scene.
I have been touching up the acting scene today - this includes making sure that nothing goes through the floor, no parts of the body go through one another, everything needs to look as clean cut and professional as possible as i have spend quite a few days getting this right. I have now restarted the whole process a few times i really want to get this 100% right (with in reason)...
I have looked back through and found that the hands on my character go through the floor and they didnt before. This maybe because i retouched aspects of the action and then it affected the rest of the rig - the arms. I'm not too sure if i am honest. It has made it very difficult to make the hand stay in the same position - i am having to key frame each individual frame and i am finishing it difficult to create continuity. However, i have done my best and it is passable, how ever if you look closely you can see that the hands slightly move when the character is hunched up on the floor.
Also the characters right leg seems to move when he is kneeling on the floor, i have tried to amend this but when i do it seems to muck up the other key frames and it looked better if i keep it like it is.
I am actually really pleased with the out come of the exercise. I am going to render it out but i think that i will come back to it in a week with fresh eyes and see if there is anything else i could do to it to improve the final outcome. Infact now i think im going to do a character walk.
Action - Side 1920x1080
Action - Perspective 1920x1080
Monday, 25 March 2013
Making the Acting Piece
To start of with, i opened the file with the rig, i saved a new project and named it version 1 - this means that when i capture it will be easier for me to distinguish what capture is what. I have watched the reference video so many times now that i could quite confidently act out the actions in real time. I am quite excited to get started.
Later on...
I have no keyed out all of the main key frames in the acting piece which is shown in the previous comment with the reference video and the key frames and also in between's. I'm pleasantly surprised with how its going at the moment, the key frames are rather accurate and the movements seems to be in time with the keys on the reference. Now i need to start keying in the in-between frames. These are the key frames which lie in between the original key frames, so i guess you could call them sub-key frames, but i call them in-between's just to keep it easy. There should be a huge difference in appearance and movement after i put the in between frames in, it should be smoother and it should also create a illusion of weight. - This will get really interesting when the actor is on the floor thumping it with his right hand - the disproportion of weight will be really important to make it look right.
Later on...
The in between frames have made an incredible change to the movement, there is a much stronger feeling of weight and power in the body. Even with just the key frames and the in between frames it has quite a strong resemblance to the reference footage. There are some major glitches - where the character falls to its knees - the feet go underneath the floor making the character sink and then rise when i corrected it on a key frame. I will have to correct these, and i imagine i will have to key frame each frame until they have all been done to the origional key frame.
Later on...
I have found that i havent been able to get the right arch in the back of the character when he is on the floor - this is due to the rather basic rig, i understand that is has been kept basic so not to confuse us, however, it means that the moment and arching of particular parts of the body are in fact not as close to the reference footage as i would have liked. I would have liked the torso to have been able to bend more at the hips so the torso was closer to the characters thighs and also the floor. This in hand would have made it easier for me to animate the head looking up - at certain points the head slightly protrudes into the characters shoulders.
Later on...
I have no keyed out all of the main key frames in the acting piece which is shown in the previous comment with the reference video and the key frames and also in between's. I'm pleasantly surprised with how its going at the moment, the key frames are rather accurate and the movements seems to be in time with the keys on the reference. Now i need to start keying in the in-between frames. These are the key frames which lie in between the original key frames, so i guess you could call them sub-key frames, but i call them in-between's just to keep it easy. There should be a huge difference in appearance and movement after i put the in between frames in, it should be smoother and it should also create a illusion of weight. - This will get really interesting when the actor is on the floor thumping it with his right hand - the disproportion of weight will be really important to make it look right.
Later on...
The in between frames have made an incredible change to the movement, there is a much stronger feeling of weight and power in the body. Even with just the key frames and the in between frames it has quite a strong resemblance to the reference footage. There are some major glitches - where the character falls to its knees - the feet go underneath the floor making the character sink and then rise when i corrected it on a key frame. I will have to correct these, and i imagine i will have to key frame each frame until they have all been done to the origional key frame.
Later on...
I have found that i havent been able to get the right arch in the back of the character when he is on the floor - this is due to the rather basic rig, i understand that is has been kept basic so not to confuse us, however, it means that the moment and arching of particular parts of the body are in fact not as close to the reference footage as i would have liked. I would have liked the torso to have been able to bend more at the hips so the torso was closer to the characters thighs and also the floor. This in hand would have made it easier for me to animate the head looking up - at certain points the head slightly protrudes into the characters shoulders.
Wednesday, 20 March 2013
Acting Reference Material
Due to using the tennis ball reference material so efficiently i decided to do the same for this project. For this project we have to recreate a choses acting scene that we filmed in class. I decided to do one which would challenge me. One of a man falling onto his knee's, thumping the floor with disbelief. I found this one of the most interesting and dynamic - the body goes from being upright and spread up low and crunched up into a ball on the floor. I also wanted to play around the the angling of the body shapes, e.g. how the elbows move the forearms compared to the top o the arms.
This is a link to the reference video i made - i used Adobe Premium to amend and add key frames and in between frames. I found the in between frames to be crucial after doing the man key frames. With out them it looked rather bionic.
Acting Reference Material
I did find the whole idea of recreating a acting piece to be rather daunting, but this process really helped me to get everything together and organised. It helped me decided what to start with first, and what did not need to be done until later. I think with out the reference material i would have really struggled to recreate this acting piece with out any timing help. I would have got the pace and timing of the key frames wrong, and it probably would have been smooth.
I also really like the angle that the action shot was filmed at - it really demonstrated the angles of the body and the way the body falls to the floor. Really interesting - i will upload the other camera angle of the action shot tomorrow morning.
Downloading Acting Reference material
After looking at all of the material that was recorded in the studio i have decided which clip i would like to use a reference for my acting piece. I have decided to use a film of a fellow student acting out a over exaggerated crying scene.
Unfortunately at the moment it doesnt seem that i can upload my reference footage but i will see when i get home if this changes. I have been following the videos have hve been kindly filmed by one of my lecturers on (Online Tutorials for reference material) however i am not sure if you will be able to get onto the page unless you are part of my university.
Unfortunately at the moment it doesnt seem that i can upload my reference footage but i will see when i get home if this changes. I have been following the videos have hve been kindly filmed by one of my lecturers on (Online Tutorials for reference material) however i am not sure if you will be able to get onto the page unless you are part of my university.
Tuesday, 19 March 2013
Walk Cycle.
I watched a great DVD in class about making a walk cycle, breaking it down into steps to make a generic walk cycle and then moving onto something more characterised. The DVD is a visual/audio version of Richard Williams book - The Animators Survival Kit. I have the book and i love it, but it was really rewarding to watch Williams explain his work and the way to think about walk cycles, it gives a different depth of information that the book gives. I am going to concentrate on two blocks at a time. The legs first - then the arms. There are important positions to include in your walk cycle. This is included in a previous post that which has images of all the arm positions and the main leg positions - contact, down, pass pose, up and contact.
When setting out making the walk cycle i was fully aware that the image that was supplied to us, and also the images on the internet are very exagerated in positions. This is to make it clear to us
When setting out making the walk cycle i was fully aware that the image that was supplied to us, and also the images on the internet are very exagerated in positions. This is to make it clear to us
Arm Positions
After completing the bottom half of my walk cycle i have decided to give the arms a go. Unfortunately i have had some technical issues with my character and when i select a object to move, it wont. It highlights the whole rig and i am not too sure why it keeps doing it. However, i took some print screens to demonstrate what i am talking about.


I tried looking at my character in different portals but this did not worked. I saved as and then re opened a older version and it still wouldn't work. Therefore i am going to leave it as a bug problem. Jon (my lecturer) says that Soft Image has a few problems with bugs which create technical issues. I however, did save my file to my memory stick and i opened it on another computer. Although this shouldn't be a problem as i remember Jon saying if you copy and paste a duplicate copy of the project folder onto the D Drive of any computer it means that the project is much stronger when it comes to loosing work and connection.
However instead of trying to fix something when i have no knowledge on how to fix it i have decided to do some research for tomorrows lesson where i am sure we will be animating the arm swings. Images i have found on the internet include:


Monday, 18 March 2013
Walk cycle Reseach
Most sane people have a fear of animating walk cycles. Many events are happening at the same time, and it can seem overwhelming. A single mistake on your first drawing can wreck the rest of the scene. However, the process can be broken down into a series of steps which can go some distance in simplifying the process.
A walk cycle can be described by four distinct poses:


I watch a really amazing DVD which is a digital version of the Animators Survival Kit by Richard Williams. It really is a great watch, he makes it so easy, all you have to do is break it down into the main positions, once you have these, you work on the timing. You can then create walks with anger, or sadness, walks with a purpose, walks of different genders, beliefs, the list is ENDLESS. We are all programmes to look and read body language, no matter what background or what language you speak, this is one language that we can all read. You can tell by facial expressions, the frowns, eyes, smiles, all these act as clues to tell us how someone is feeling. It is the same for a walk cycle, the height of the pass pose, the length of the stride, the bend at the contact; all these factors give us visual language and can really make a walk interesting.


There are so many things to bare in mind - the angles of the hips, shoulders, arms. The follow through of the arms, are the rigid? are they floppy?
Here are links to my first character walk cycles i made in the first part of this course. Its important for me to look back on them and see what i could do better, what looks wrong, as im sure now, i could see some things that dont look right.
Sunday, 17 March 2013
Second and Final Bowling Ball bounce
Okay, so after looking into making my bowling ball move i have made a second fully rendered bowling ball drop. I did this to the tennis ball mainly due to what my tutor said but also because i have seen other people working on their ball drops and they have bounced in a direction.
Bowling Ball CU
Bowling Ball MCU
I am really pleased with this second attempt. I think i spaced it out better then the tennis ball. And i am pleased with the drop and the way the ball fades out in speed, although i think the end of the roll could have been longer. On the whole i think it is much better now!
Saturday, 16 March 2013
Rendering out ball bounces
Initially I got rather confused by the process in which you render out the animations. Initially I thought you had to capture your animation which you do by pressing the little camera icon at the top of the window, scroll down to capture, and capture it out to QuickTime This worked perfectly, I then tried to upload it to Vimeo which didn't work. After research I found that to upload your bounced to Vimeo you have to render out the animation.
When rendering out the animation on softimage, it renders the animation in a image sequence - this means that instead of it coming out as a video or QuickTime file it exports into photographs. This subsequently means that once the rendering is finished we then have to import all of the image files into After Effects, place them in the correct sequence in a time like and then export that AE project into a QuickTime clip. If you do it in this process there seems to be more benefits, you get the correct lighting on the balls as well as shadowing.
I have now learnt that the purpose of the capturing tool is rather for looking at what you have animated rather then producing your final clip. This is because some 3D software struggle to churn out all of the frames in your timeline. This could be due to the file size being too big so the programme skips some frames to make it play at Real Time. When exporting your clip you have to make sure that the RT button selection at the bottom is on, other wise the programme will export the animation as 'all' frames. This means that the animation will play as quickly as possible as the computer allows it.
Friday, 15 March 2013
Tennis Ball Final Versions
This is the final version of the tennis ball - i will upload all the different versions i made when finishing this ball bounce. However, after doing the reference video i didnt actually have to do too many versions to get it looking okay.
Below is the links to both of my renders - Close up and Medium Close up.
Tennis Ball Close Up
Tennis Ball Medium Close Up
Im actually rather pleased with the out come - i do think that it could be a little quicker at the come downs at the height of every bounce, i copied the video reference frame for frame so i was a little baffled as to why this was happening. I think that the bounce of the ball its good, although i think that maybe it sticks a bit too much on every down - maybe i could make the frame after the touch with the ground higher/ further away from the touching frame. This would make the ball appear less sticky.
I went back and looked through my frame work and infact i had done this. So maybe its that i made the bounce back too slow? Its getting rather late now so i am going to call it a night and look at it tomorrow with fresh eyes - ill give a better evaluation then.
Thursday, 14 March 2013
First Bowling Ball
This is only one pass of my first fully rendered version of the bowling ball.
Bowling Ball First attempt
This is my first attempt at the bowling ball - I used to reference footage which i included in a previous comment's about the bowling ball to help me make this as accurate as possible. When i was first given the task to make the ball bounces, i heard my 3D tutor tell another student that the ball shouldn't role too much as it would make it look like the ball is on a slope and therefore the travel shouldn't be a large distance. I interpreted that as the balls should bounce on the spot. REALISTICALLY..... if you 'dropped' a bowling ball from a height - it would just bounce near enough on the same spot. If you bounced the ball then it would bounce in the direction you intended to bounce the ball in!! The brief says to animate a shuttlecock bowling ball and tennis ball that has been dropped from a height of 1 metre. So logically if would only bounce on the spot - but due to worry i thought i would go one on the spot and one bouncing in a direction.
So that is why i animated the bowling ball dropping on the same spot. Anyway i thought i would give it a go, similarly like i did with the tennis ball! Im going to make the ball bounce in the sense of frames very similar to the first attempt. I will use the reference footage again that i included on a previous post but i will try and make the bounce slightly better spaced then the tennis ball bounce. Im thinking i could slightly move the spacing for each bounce of the bowling ball and just make it roll at the end? This maybe easier to animate and look more realistic. I wont animate the roll too much because i don't want it to make it make it seem like the ball is on a slope.... It should be much easier to animate the roll compared to the tennis ball because i can squash and stretch the bowling ball at any point, there isn't any restrictions! Bonus!!
Wednesday, 13 March 2013
Bowling Ball
Here is a link to my final reference footage:
Bowling Ball reference footage
I have to admit that i only found out how to download youtube files as video files after i actually made the bowling ball bounce. This is my bowling ball drop at the moment- This is fully exported and
Bowling Ball - Fully exported
This is only one of the view ports for the Bowling ball - i think i would like to add some more key frames to the bounce - maybe i will add a bit of a role at the end - but i think it needs a bit of travel to make it look good, how ever i am fully aware not to make it role too much as it could make it look like the ball is on a slanted hill.
Tuesday, 12 March 2013
Tennis Ball Reference footage.
Luckily i was able to download some files from the internet of some reference material to help with the ball bounce. I managed to download this file which was made by my university. Here is the original file which i uploaded to my Vimeo account
Origional Tennis Ball Clip
I then imported this video to Adobe Premium Pro which is a programme where you can add certain affects like 'time code' and 'titles'. These make it easy for me to label where the key frames are to give me a good feel for how to recreate the film in Soft Image. This is the amended film i made to demonstrate the key frames.
Key Framed Tennis Ball Clip
I also thought it would be a good idea to look into how a tennis ball bounces in slow motion because i'm thinking that a tennis ball retracts into its self rather then actually morphing out e.g. squash and stretch. This is something that i cant recreate in soft image because to make it look like a realistic bounce i need to squash the ball, and the ball has a setting on it so it doesn't loose any volume.
Slow Motion Tennis Ball
Its actually so interesting - the bottom of the tennis ball hat has contact with the floor actually retracts inside itself which is perfectly feasible as it is a hollow ball.... So its interesting that we need to squash and stretch a ball to make it look realistic. Im going to use my drawings of the ball bounce as reference as well, im not quite confident to get stuck into it.

Shuttecock - MCU - CU
These are two films for my shuttlecock
[to be continued]
Shuttlecock Close UP
Shuttlecock Medium Close Up
[to be continued]
Shuttlecock Close UP
Shuttlecock Medium Close Up
Saturday, 9 March 2013
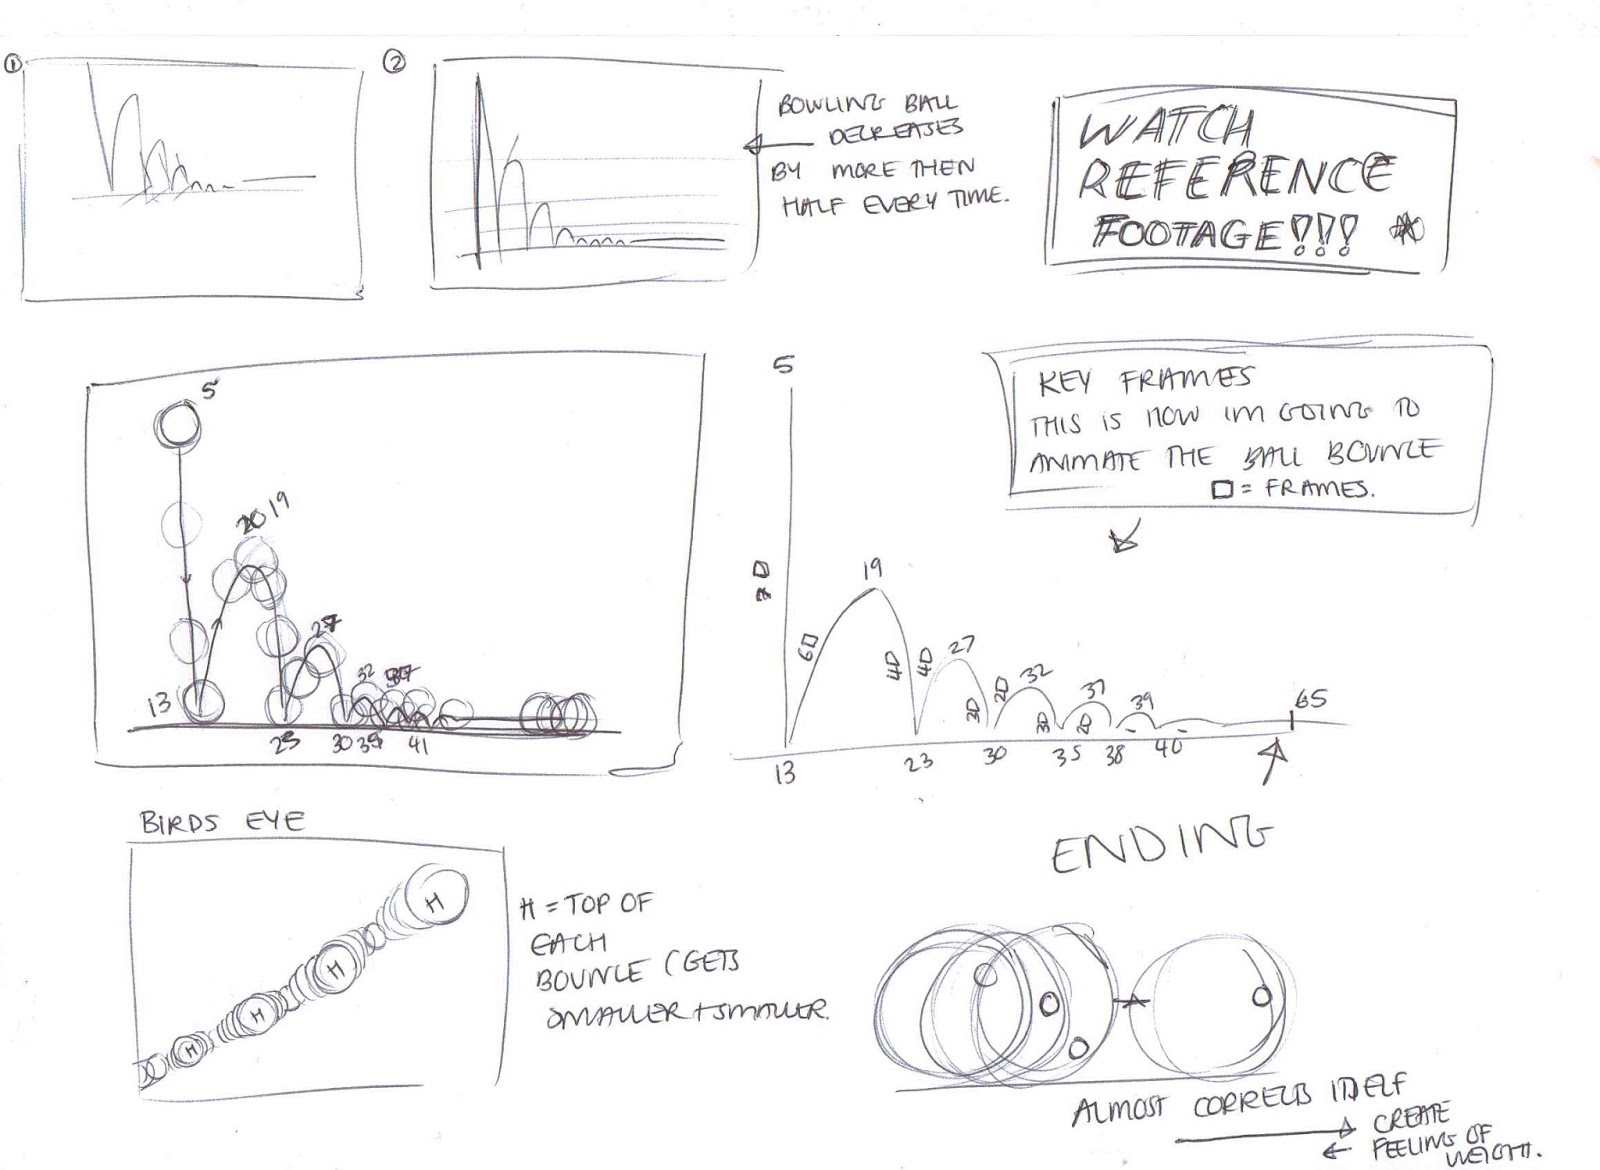
Bowling Ball Diagrams

These are some of the thumb nails i have made for the bowling ball bounce - im really excited to get stuck in and i think that it will be quite successful (hope)
Friday, 8 March 2013
Shuttlecock aniamtion

Compared to the other two ball bounces I am much more interested by the way a shuttle cock falls. The way in which a shuttle cock bounces when it lands on the floor depends on the angle that the ball lands in comparison to the flexible structure - shown in the image above. The distance between the area in which the cork base hits the floor and the beginning of the flexible structure has a huge impact on how far and the direction of the bounce.

The way a shuttle cock bounces is more erratic then that of a bowling ball of tennis ball, and therefore you can get away with the direction of the bounce a little more then you would do with a bowling ball as its bounce is very rigid. Before i start to animate the bounce i want to look at different videos i can find online of a shuttle cock bouncing.
Initially i have come across how a shuttle cock would fly through the air. The ball always leads the way and lands first as it is the heaviest part of the object. If you hit a shuttle cock well you would hit the ball and therefore the ball has the most amount of force applied to it which means that it should be the fastest part of the object. Being made out of a cork structure this means that it has a lot of bounce.
The structure of cork : cork as a material has a lot of bounce, i have never looked into why is has such a bounce but i imagine that it has tiny particles or molecules of air - so small to the human eye that can cannot see them. These little molecules or particles give the cork movement, the pockets of air and squash when hitting an object and fill up again when no pressure is applied. This is why it is used as a lid for a bottle of wine etc. The air can be compressed out of the cork so that it is air tight. Much like when you go into sainsburys or any supermarket to buy some jam; the lids now have a extra tab on the top which when opened pops up, so as a customer you know when it has been opened. Corks are designed this way.
Structure of a cork:

I found this image online which is a microscopic image of a piece of cork. The demonstrates the tiny pocket of air that i assumed would be there to cause the elasticity of the object. You could see it as tiny little tennis balls all compounded into one object. However, due to the cramped nature of the air pockets they cannot repel against the floor as well as the tennis ball as the force of the bounce would travel through out the whole cork structure which would loose a lot of thrust energy. Where as with a tennis ball it only has to travel through itself - which is a empty shell.

To test this, i got ten tennis balls, placed them in a bag and tied it up tightly to allow minimal movement. I wanted to see how differently a tennis ball would bounce with other balls close. - They bounced well the the direction of the bounce was rather off. Obviously this was only a small test, this is not a scientific test but it was interesting to see how it would work.
In Soft Image:


Thursday, 7 March 2013
Video resources for ball bounces
Shuttle cock:
Tennis ball:
Bowling ball:
JUST IF ANYONE IS INTERESTED :
This link - Golf Ball bounce is a link to a golf ball. I didnt think that it was squash or stretch, much like a bowling ball however after a lot of research i couldnt have been more wrong...
Research for Bowling ball drop
The
bowling ball has been dropped from an approximate height of 1 metre
Animate
the bowling ball entering the shot from the top demonstrating its characteristics.
Fully rendered shot (looped 3 times)
QuickTime format – h.264 – 1920x1080 square pixel
25fps
Research -
Timecode on After effects allows you to put a composition of a live bowling ball dropping and see the frame rate so i can accuraetly recreate the sequence.
- Facts
- A bowling ball weights between 2,7 to 7,3 kilograms.
- Bowling balls were made out of wood until the early 1900s.
- Bowling is the number one participation sport in America.
- The origins of bowling can be traced about 4,000 years back to Rome and Greece.
If a bowling ball and a tennis ball were dropped at the same height, assuming they have they same aerodynamic values, that is they are they same shape and same size they will hit the ground at the same time. Weight has nothing to do with it, only wind resistance does. Gravity's force is constant. No matter the weight it is 9.8 meters per second. The pull of gravity is the same on the bowling ball as on the tennis ball. You can take a cannon ball and a bowling ball, of the same size and they will fall at the same speed and hit the ground at the same time even though the bowling ball only weighs 7 pounds and the cannonball weighs 50 pounds.
This leads me to look into Newtons law of Gravitation, according to the Newton gravitation (remember that it's just an approximation), the force acting on a body of mass m2 in r2 caused by a body of mass m1 in r1 (in this case, the Earth) is
with G constant.
Using the Newton equation for the body 2 (F = m2 d2r2/dt2), we have
- G m1m2 (r2 - r1)/|r2 - r1| 3 = m2 d2r2/dt2 →
→ - G m1 (r2 - r1)/|r2 - r1| 3 = d2r2/dt2.
- G m1m2 (r2 - r1)/|r2 - r1
→ - G m1 (r2 - r1)/|r2 - r1
Now, if you assume that r1 = 0 and consider bodies that are not too distant from the ground, you may approximate r2 = rT + r (rT is the Earth radius) with rT, that is a constant. And so the acceleration of any body is
d2r/dt2 = d2(rT + r)/dt2 ≈ - G m1 rT/|rT
and so you see this acceleration is constant (it's the famous "g"), independent from the mass m2 of the falling body. (Note that, even without our assumptions, the acceleration does not depend on m2
*** There is a difference between speed (or velocity) and acceleration. They are, of course, related, but acceleration is the rate of change of velocity. When you are sitting in your car at a red light and the light turns green and you step on the gas (or accelerator!), your car accelerates from zero to some final velocity (hopefully not much more than the posted speed limit). Your speedometer clearly shows the change in velocity as the needle moves clockwise. The faster that needle moves, the greater the acceleration.
On Earth, objects do not fall at constant speed, as your question suggests. Gravity accelerates objects toward the center of the Earth at 32.2 ft per second per second (which can also be written as 32 ft/s2). In other words, an object's velocity will increase by 32.2 ft/s (or 9.8 m/s) for each second the object falls until it reaches its terminal velocity, which you can think of as a kind of speed limit. Terminal velocity is reached when air friction equally opposes the force of gravity. Different objects will have different terminal velocities, depending upon their shapes. ***
Imagine you are on top of a tall building and holding a bowling ball over the side of the building. At time t = 0 seconds, you let go of the ball. At that exact moment, the ball is traveling at 0 ft/s, but as the ball experiences gravity without your holding it, it starts to fall. After one second, the ball will be traveling 32.2 ft/s. After two seconds, it is traveling 64.4 ft/s, and after three seconds, it is traveling at 96.6 ft/s.
So you see that falling objects do not fall at the constant rate of 32.2 feet per second but actually accelerate -- that is, pick up speed -- at a rate of 32.2 feet per second per second.
http://wiki.answers.com/Q/Does_gravity_pull_things_down_32.2_feet_per_second
Subscribe to:
Posts (Atom)